


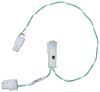
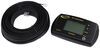
One touch brings your RV's controls together. The color touchscreen auto-dims as daylight changes, so checks are easy at noon or midnight. Mount it the way you prefer and plug in with the included cables for a clean, simple install.
Breaking camp or pulling in after dark, you get a single read on the whole system: battery state of charge, solar watts and voltage, plus inverter ac in, ac out, and dc watts. It is a quick way to spot what is happening, like panels being shaded, no shore power passing through, or a battery temperature that needs attention. The screen dims at night so you can check status without lighting up the cabin.
Use the touchscreen to view and adjust the charging parameters your system supports, confirm battery capacity for accurate state-of-charge readings, and check inverter status. Away from the panel, open the Go Power! Connect app to monitor the same metrics and make quick changes from your phone when the system allows it.
California residents: click here
Videos are provided as a guide only. Refer to manufacturer installation instructions and specs for complete information.
Hi everybody, Andy here with etrailer. Let's take a quick look at this Go Power! PowerTrak Screen. Now if you're looking for an easy way to keep an eye on your RV's entire Go Power! system, this touchscreen is going to give you everything in one place. At a glance, you're gonna be able to see your battery percentage, how many solar watts you're pulling in, and what your inverter is doing. So, no digging through menus or checking multiple displays. This is designed to be really user-friendly.
The screen's gonna automatically dim thanks to the built-in light sensor, so it's bright during the day and easy on the eyes at night. You're gonna be able to mount it vertically or horizontally, whichever fits your setup the best. And what really sets it apart is how much control this is gonna give you. You're gonna be able to tap the screen to adjust charging parameters or power settings. It's gonna monitor your battery's state of charge, DC power capacity, and charging details.
And it's also gonna show real-time solar input, like watts, voltage, and charging status. And if you're using an inverter or a charger, you're gonna be able to see your AC input/output, DC watts, and even temperature readings when supported. And if you wanna check your system from your phone, you can. It does pair with the Go Power! Just connect the app so you can monitor and manage everything remotely. So this does pack quite a few features in it.
Installation is gonna be pretty simple. You are going to get instructions here to guide you through the installation and the operation. It's gonna be, again, gonna be pretty simple. You're gonna get hardware as you can see here, along with the plug-in cable. So no extra parts are really gonna be needed for installation, just tools.
And let me go ahead and give you some measurements here. I said it was compact, so without dropping it here, let me see if I can give you some measurements. So looking at the overall length, we're sitting about 4-3/4 inches. The height, we're almost 3 inches, about 2-13/16 inches. The thickness, about 3/4 of an inch or so. Now if you happen to have any other questions, whether it's about this screen or anything else that we have here at etrailer, don't hesitate to reach out, because ultimately, we do wanna make sure that you're getting exactly what you need. Well, again, my name is Andy. Thank you for joining me.
Customer Satisfaction Score:
89% were satisfied with this product
11% of customers were not satisfied
Ratings & Reviews

Info for this part was:
At etrailer we provide the best information available about the products we sell. We take the quality of our information seriously so that you can get the right part the first time.


Thank you! Your comment has been submitted successfully. You should be able to view your question/comment here within a few days.
Error submitting comment. Please try again momentarily.